Instructions for Linux 64-bit
Prerequisites / Basic Information
- These instructions were created using Ubuntu Linux. The client is available exclusively for 64-bit Linux systems
- We cannot guarantee that the client is compatible with every Linux distribution
- The actual appearance of the application in the screenshots may vary depending on the distribution or version
- The latest updates are installed on your device, and the latest version of the software is being used
Step 1
Download the software. The download requires you to log in with your user ID (b******):
Cisco VPN Client for Linux 64-bit: uhh-anyconnect-linux-64.tgz (Version 5.1.9.113)
File checksums:
SHA1: 6199eaaa89cb39a79b3579ce9621d306da7cb8f9
Supplemental End User License Agreement for AnyConnect v4.x
File checksums:
SHA1: daef180c1f635def2ed95309b1f9c4447672182c
Step 2
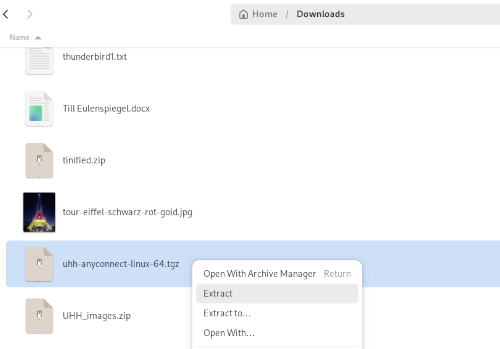
Extract the archive by right-clicking and selecting “Extract”
Step 3
Open a terminal window and grant yourself root privileges (sudo su)
Navigate to the directory you just extracted and then to the /vpn subfolder
Mark the installation script vpn_install.sh as executable (chmod +x vpn_install.sh) and run it by entering “./vpn_install.sh”

Step 4
The installation script displays the license agreement. Accept it by entering “y”, which will start the installation

Schritt 5
Start the client

Step 6
If you have an active internet connection, establish a connection by entering the corresponding VPN access point:
vpn.rrz.uni-hamburg.de
Then click “Connect”

Step 7a
A webpage will open where you must log in with your user ID (b.....) and the corresponding password. You may need to scroll down and click “Continue”
(Note: If the browser window for entering login credentials does not open as shown in Figure 5b, please check whether the browser you are using was installed as a “SNAP version.” This may cause issues, so the browser may need to be installed via “apt.”
Using Firefox as an example:
Back up the Firefox profile folder using: cp -Rav ~/.mozilla ~/.moz-backsudo snap remove firefoxsudo apt install firefox
Step 7b
If your username is already subject to 2FA, you must additionally authenticate with a second factor. If not, this step does not apply to you. You can find all information regarding 2FA here
Done / Completion
The VPN connection has been successfully established
Enable access to the local network
If you wish to access your local network while connected via VPN, please enable the setting “Allow local (LAN) access when using VPN” in the client settings.
Warning:
This is a security risk! You should under no circumstances enable this setting if you are connected to an internet café’s Wi-Fi or another public network