Setup on smartphones and tablets
On this page you will find step-by-step instructions on how to connect your student e-mail account with devices running iOS or Android.
How-to: Setting up a student email account for iOS
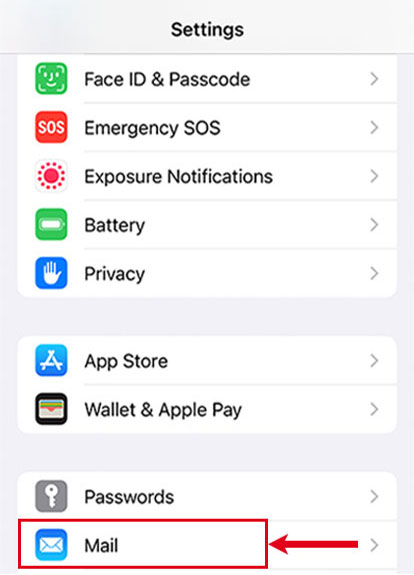
Step 1: Go to settings and open “Mail”
Open the “Settings” app on your mobile device (iPhone, iPad). Browse the list of items for “Mail”. You will find it if you
- type “Mail” in the search field that is displayed below the headline “Settings” and press enter or
- swipe the screen bottom down until you reach the item “Mail”.
Tap on the entry to open it.
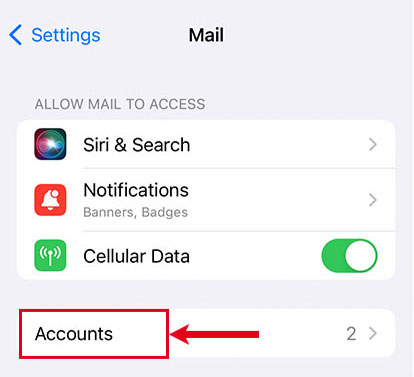
Step 2: Add an account
Tap on the button “Accounts” that is displayed in the next view.
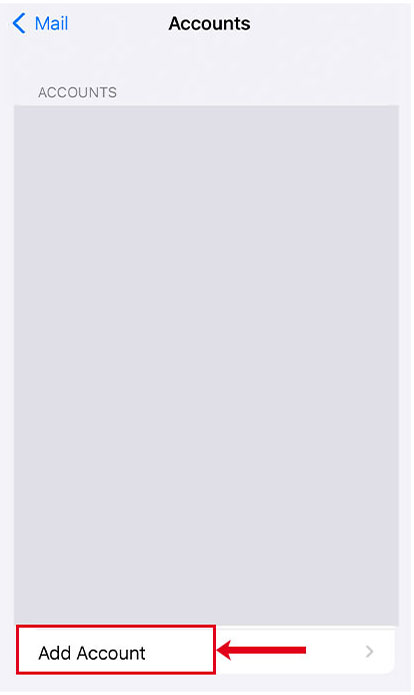
You might see a list of email accounts already connected to your “Mail” app. Select “Add account” to add your student email account as well.
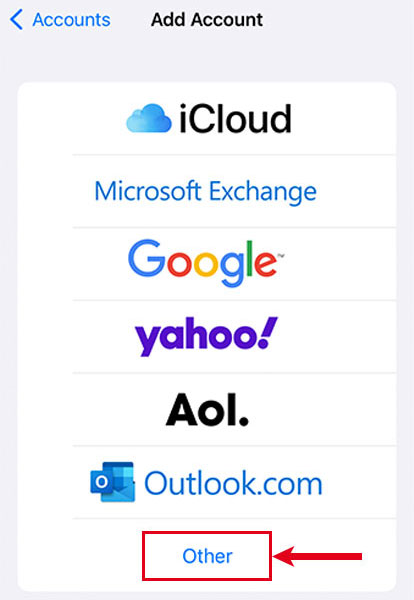
Tapping the button “Add account” will redirect you to a new view that shows you a list of preselected email service providers. Choose “Other” at the end of the list.
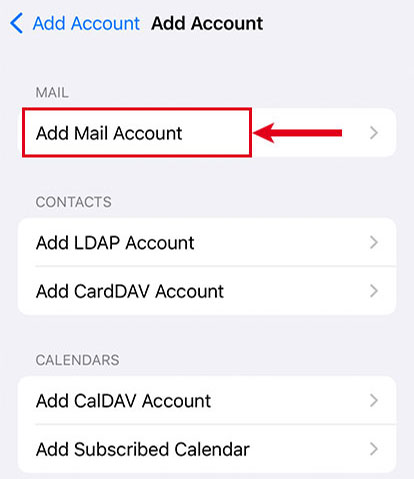
In order to add your student email account, select “Add mail account” on top to continue the process.
Step 3: Enter account data
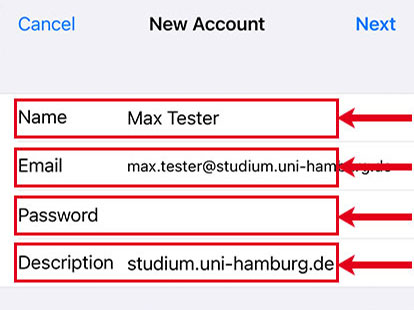
Now it is time to enter the data you have received for your personal student email account. Fill out the described form fields to add your student email account:
- Name: Type in your full name.
- Email: Add your student email address.
- Please note that your email address at Universität Hamburg follows the pattern firstname.lastname@studium.uni-hamburg.de
- If you are not sure of your email address:
- Log in to Surfmail and have a closer look at the welcome message that you should have received with your enrollment documents. This email provides all relevant information concerning your student email address.
- Alternatively, you can visit the User Account Management Portal of Universität Hamburg and check your user account for further information).
- Password: Enter the password belonging to your Universität Hamburg username (also known as “B-Kennung” in German, STiNE ID, or STiNE account).
- Description: Change the pre-filled data to “Uni Hamburg” or “studium.uni-hamburg.de”. (A clear description will help you to distinguish your email accounts linked to your device. It is possible to change the content of this form field later again).
Confirm your entries by tapping “Next” top right.
Step 4: Set up server for incoming mails
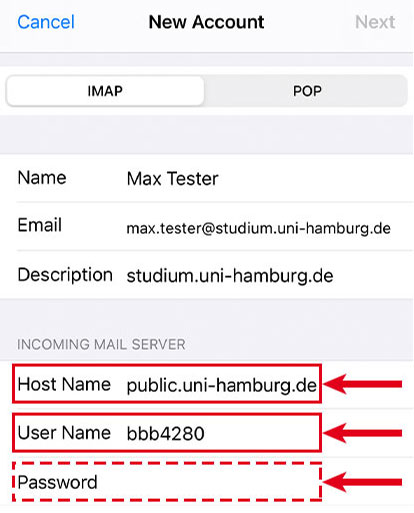
Confirming your data opens a new view and the system asks you to provide the data for setting up the incoming mail server. Please fill out the corresponding fields with the following information:
- Host Name: Enter “public.uni-hamburg.de” as your host information.
- User Name: Type your Universität Hamburg username (in German also known as “B-Kennung” and structured as follows: 3 letters followed by 4 digits).
- Password: If not pre-filled, fill out your password that belongs to your Universität Hamburg username.
Swipe down on your screen to continue with step 5.
Step 5: Set up server for outgoing mails
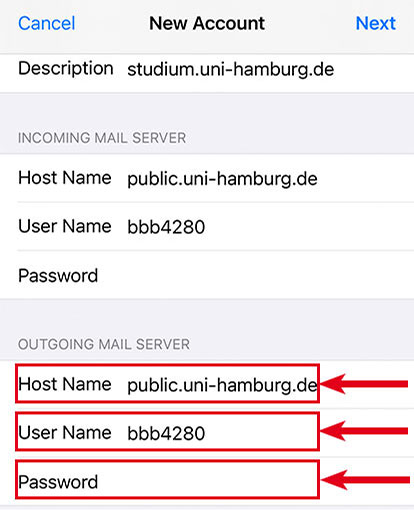
Add the data to configure the server for outgoing mails in the corresponding form fields in the section “Outgoing Mail Server”:
- Host Name: Enter "public.uni-hamburg.de" as your host information.
- User Name: Type your Universität Hamburg username (in German also known as “B-Kennung” and structured as follows: 3 letters followed by 4 digits).
- Passwort: Fill out your password that belongs to your Universität Hamburg username.
Confirm your entries with “Next” top right.
Step 6: Finish setup
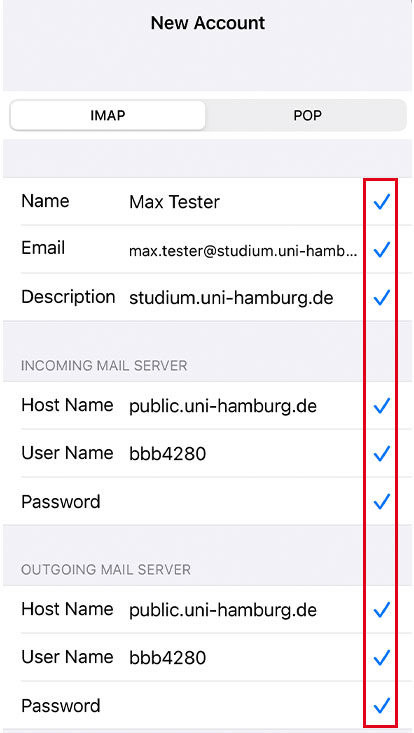
Your confirmation creates a new overview displaying all your entered data. Check marks at the end of each line will verify their correctness. If so, the setup of your student email account is completed.
You will find the mailbox of your student email account in the “Mail” app of your device. It enables you now to send and receive messages from this email account.
How-to: Setting up a student e-mail account with Gmail (Google) for Android
The Gmail app for email is usually already installed on your device and set up for your private GMail account. Then you can easily add your student mailbox as an additional mailbox as described below.
However, if you are not yet using the GMail app, we recommend using the K-9 mail app for privacy reasons.
How-to: Setting up a student e-mail account with K-9 Mail (OpenSource) for Android
K-9 Mail is an open source email client focused on making it easy to chew through large volumes of email. It works with basically every email provider.
It is part of the Thunderbird family and will transform into Thunderbird on Android. So if you are privacy-aware and like using open source K-9 Mail is worth checking it out!
This page only documents the steps related to the configuration of the mailbox located on the public mail server of the UHH. Knowledge of how to use Android, such as installing APPs, is taken for granted. There is also the K-9 Mail App documentation which helps with question regarding the app itself.
Configuration steps
Step 1: Open dialog for setting up a new account
Start the dialog for setting up a new account. If you start the app for the first time this will come automatically.
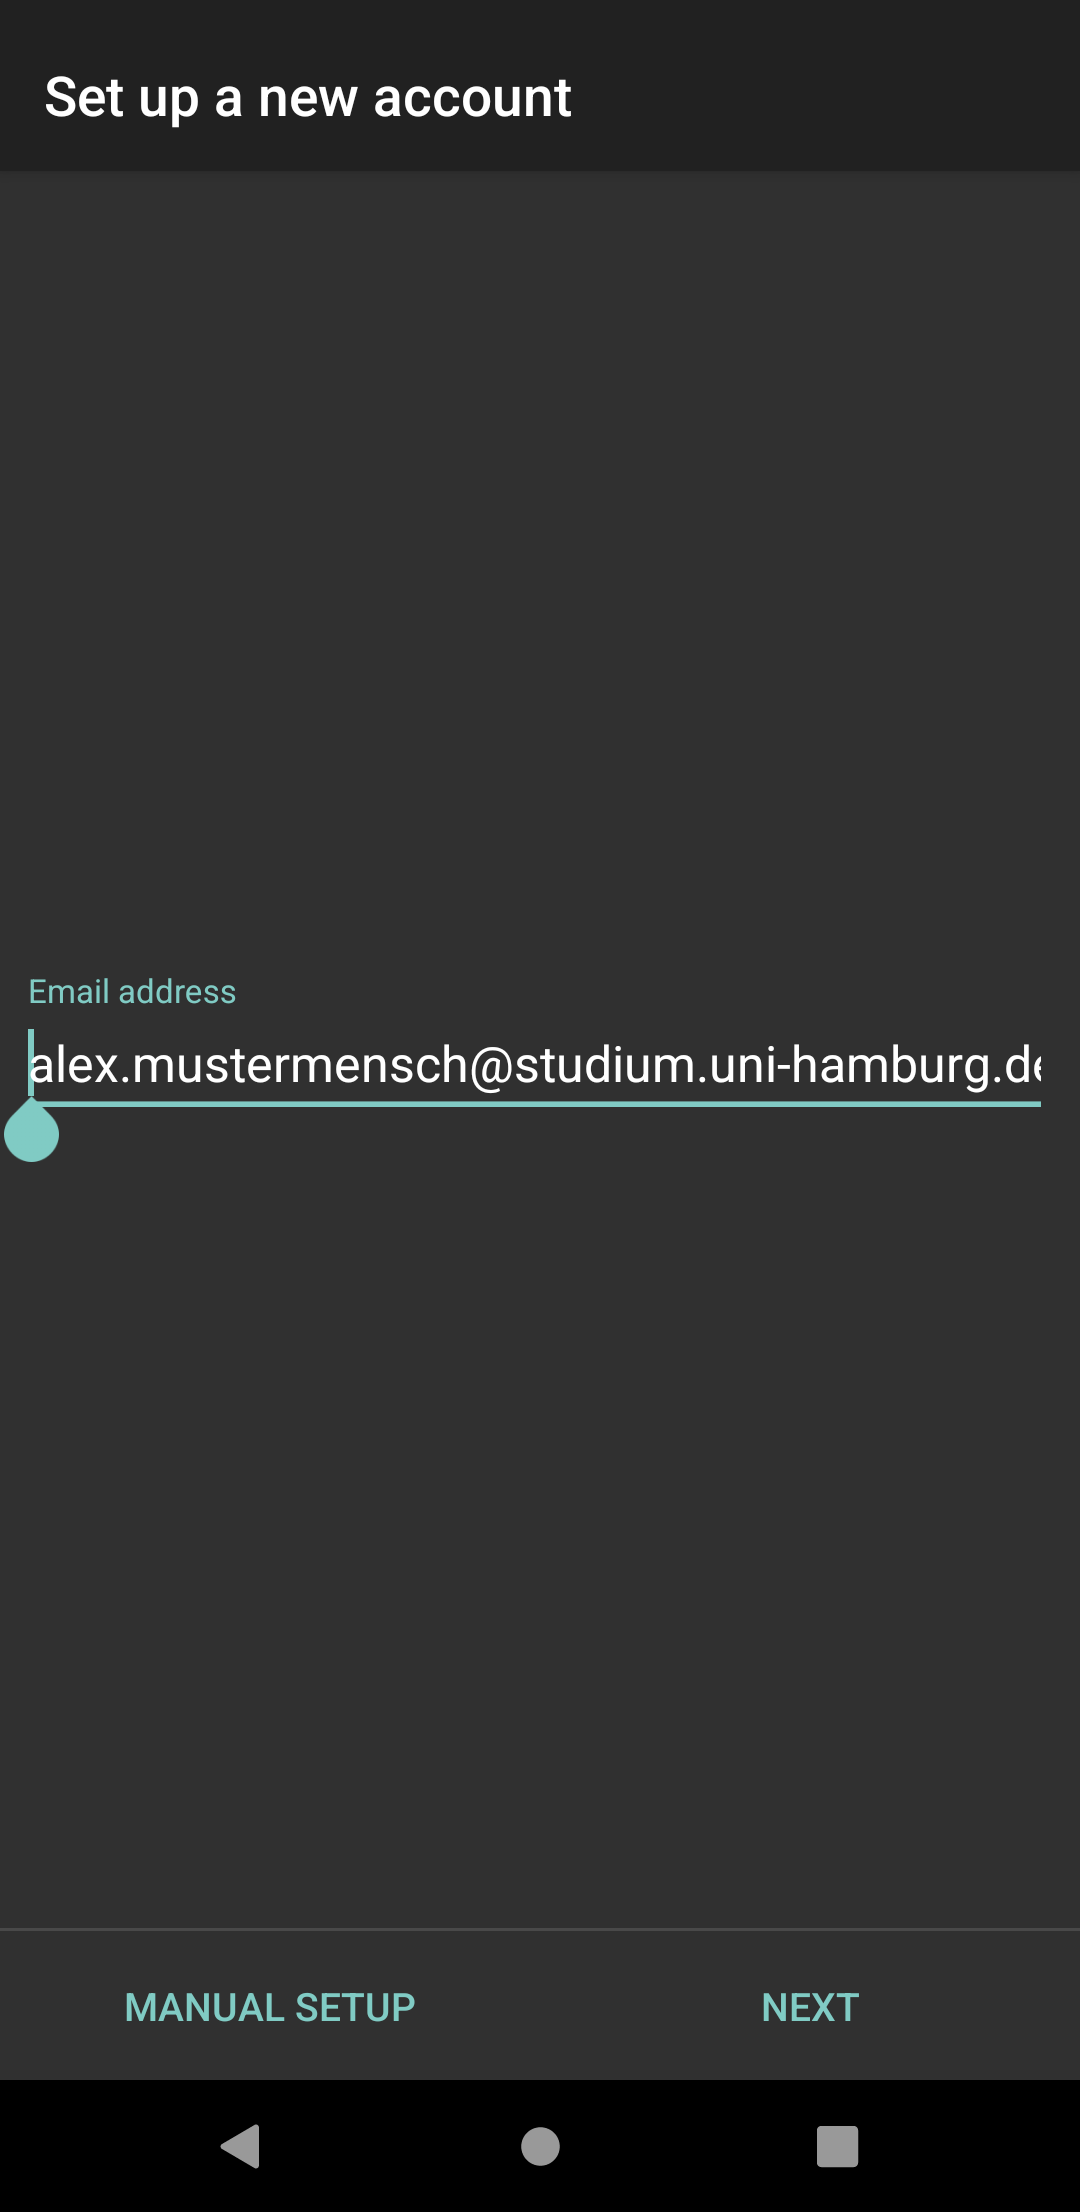
Step 2: Enter your UHH e-mail address
Enter your UHH e-mail address (e.g. alex.mustermensch@studium.uni-hamburg.de) and select "MANUAL SETUP".
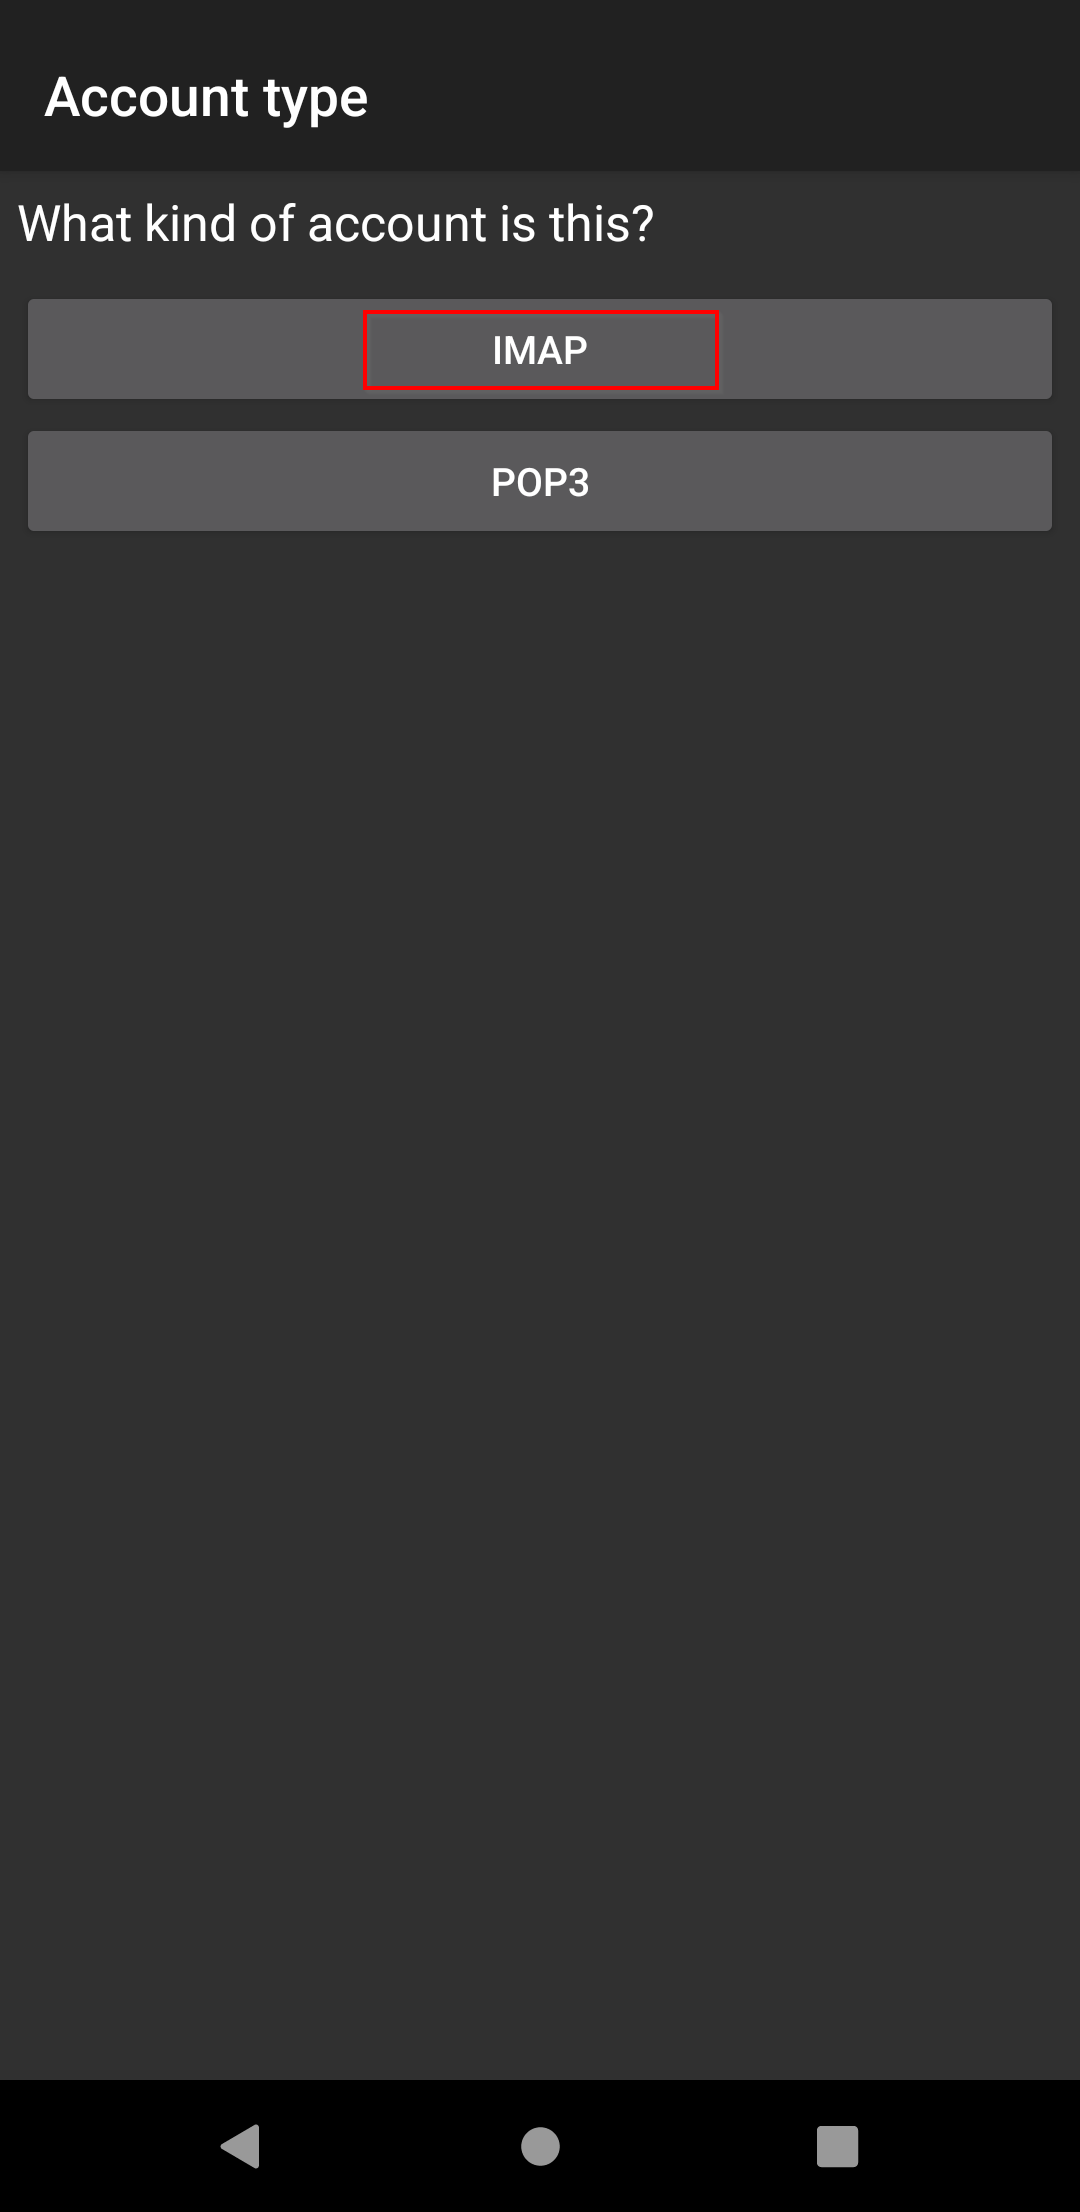
Stop 3: Select account type
Select account type "IMAP"
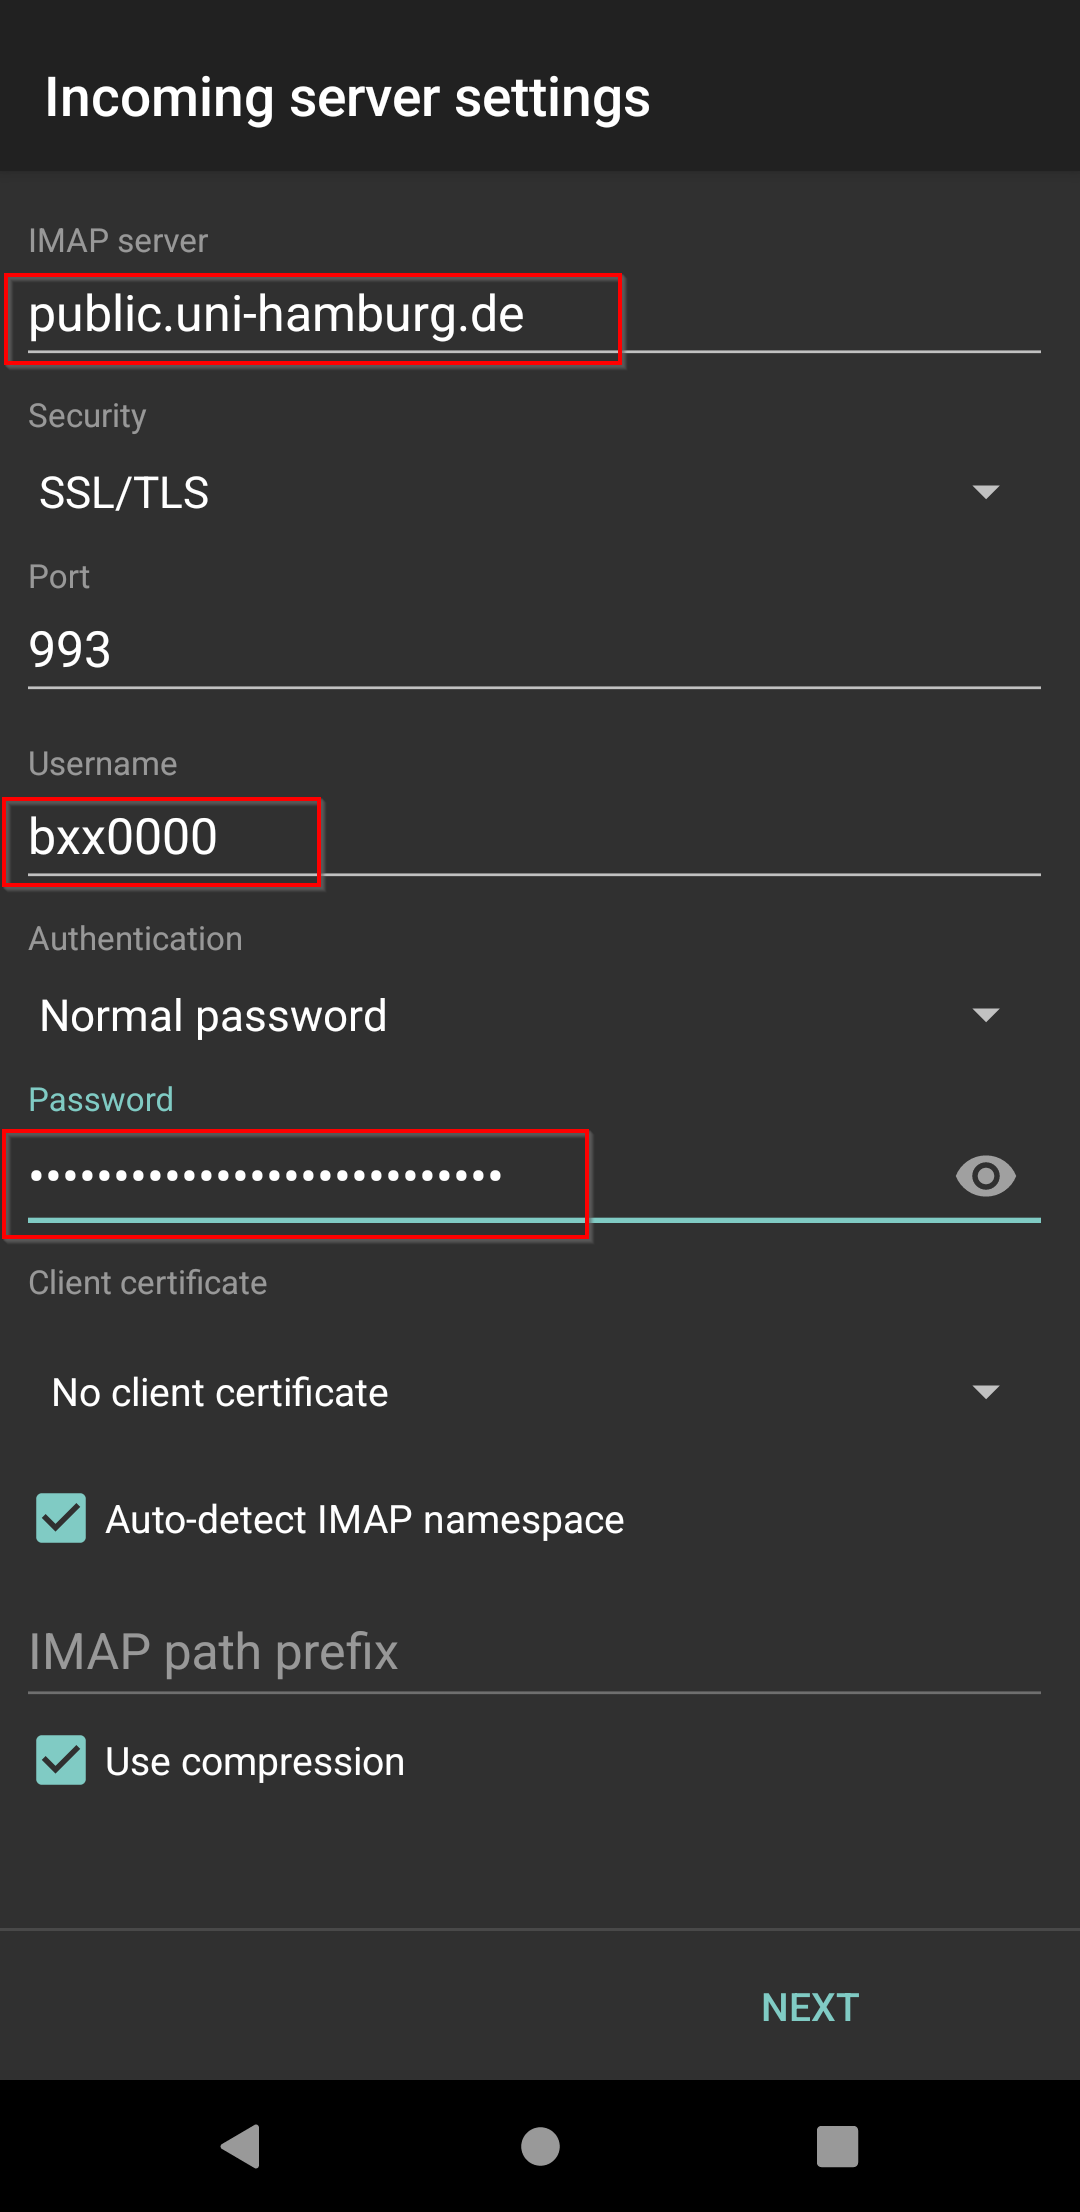
Step 4: Incoming server settings
Change in the incoming server settings:
- IMAP server to public.uni-hamburg.de
- The username to your B-Kennung
- Enter your password for your B-Kennung
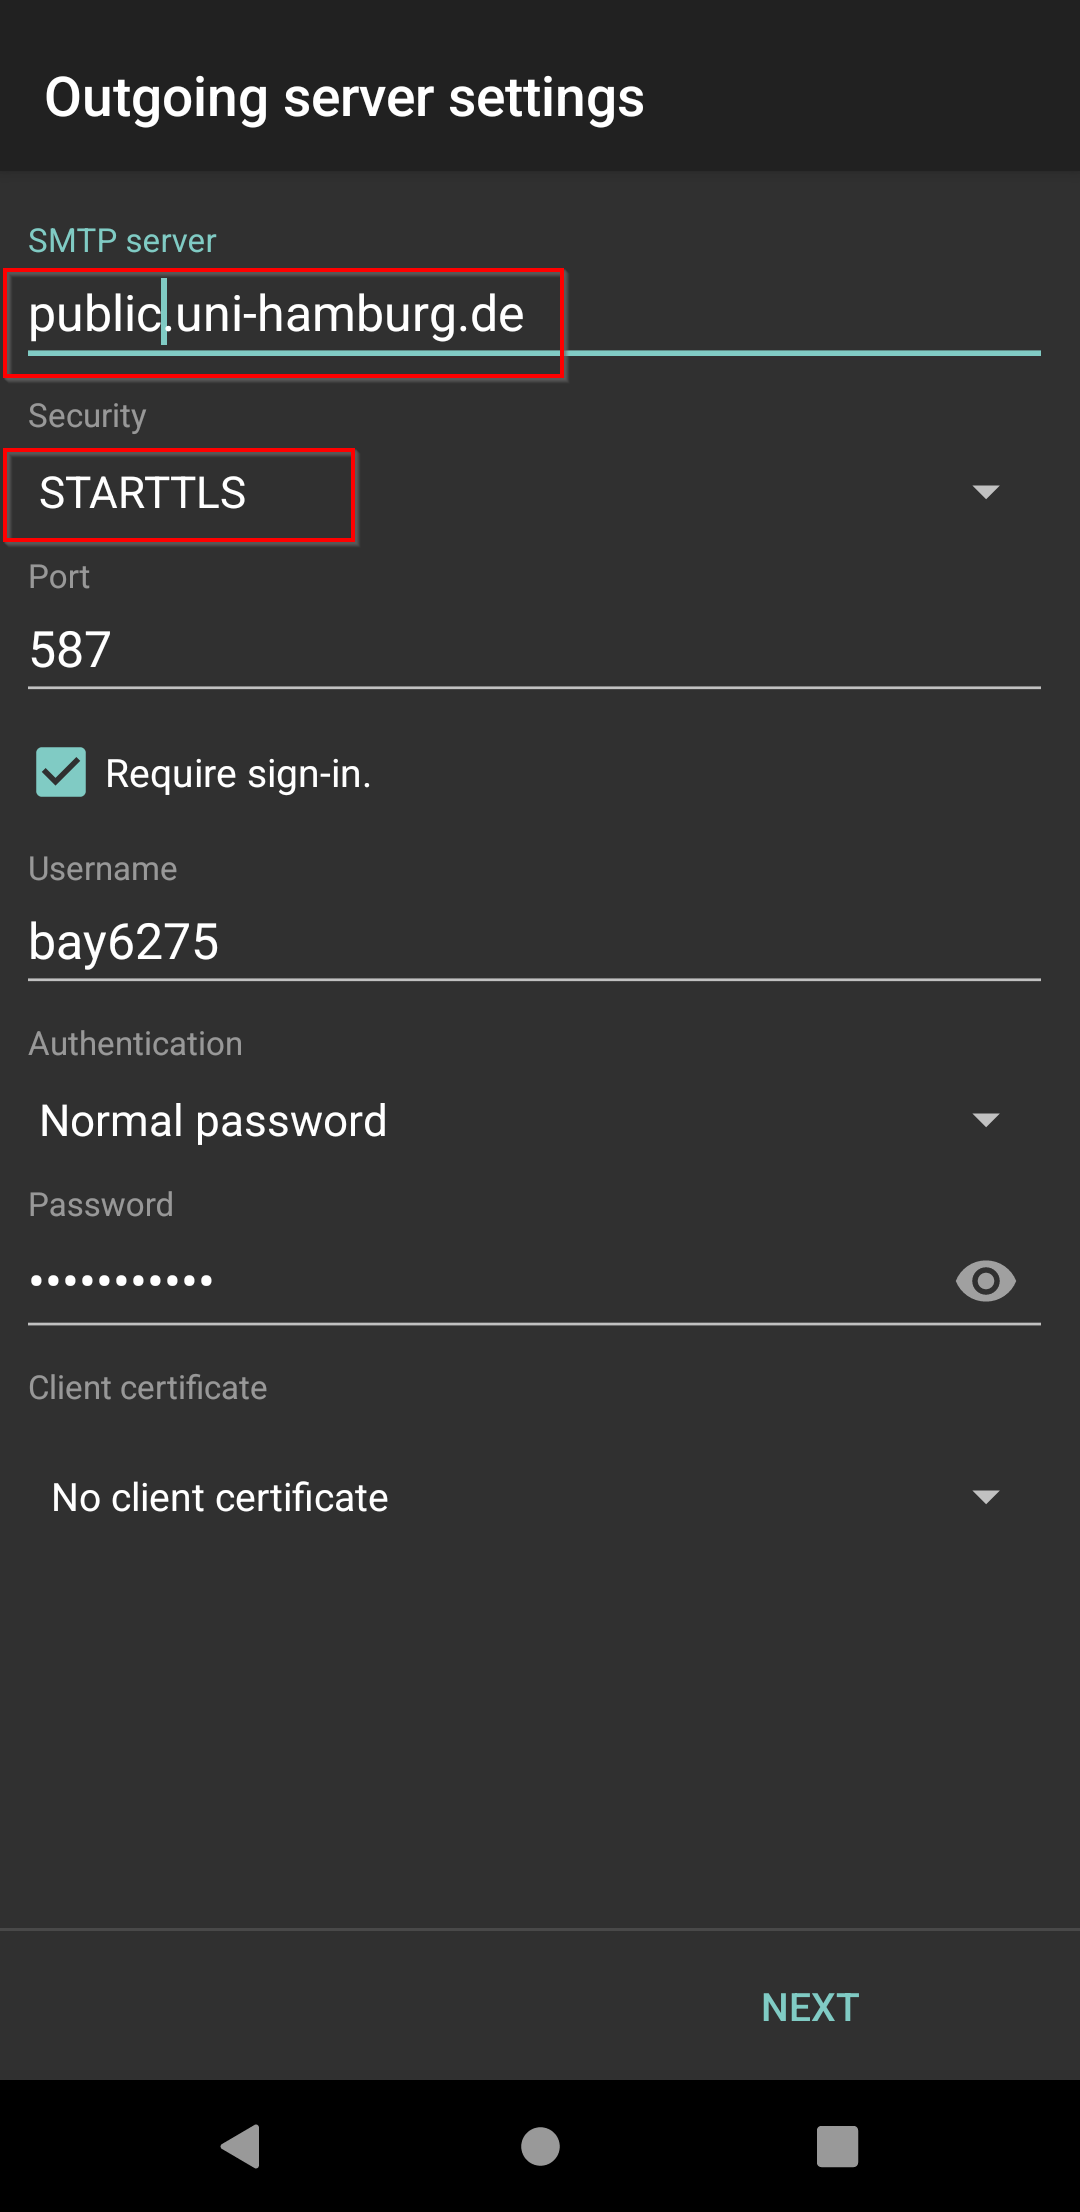
Step 5: Outgoing server setting
Change in the outgoing server settings:
- IMAP server to public.uni-hamburg.de
- Security to "STARTTLS"
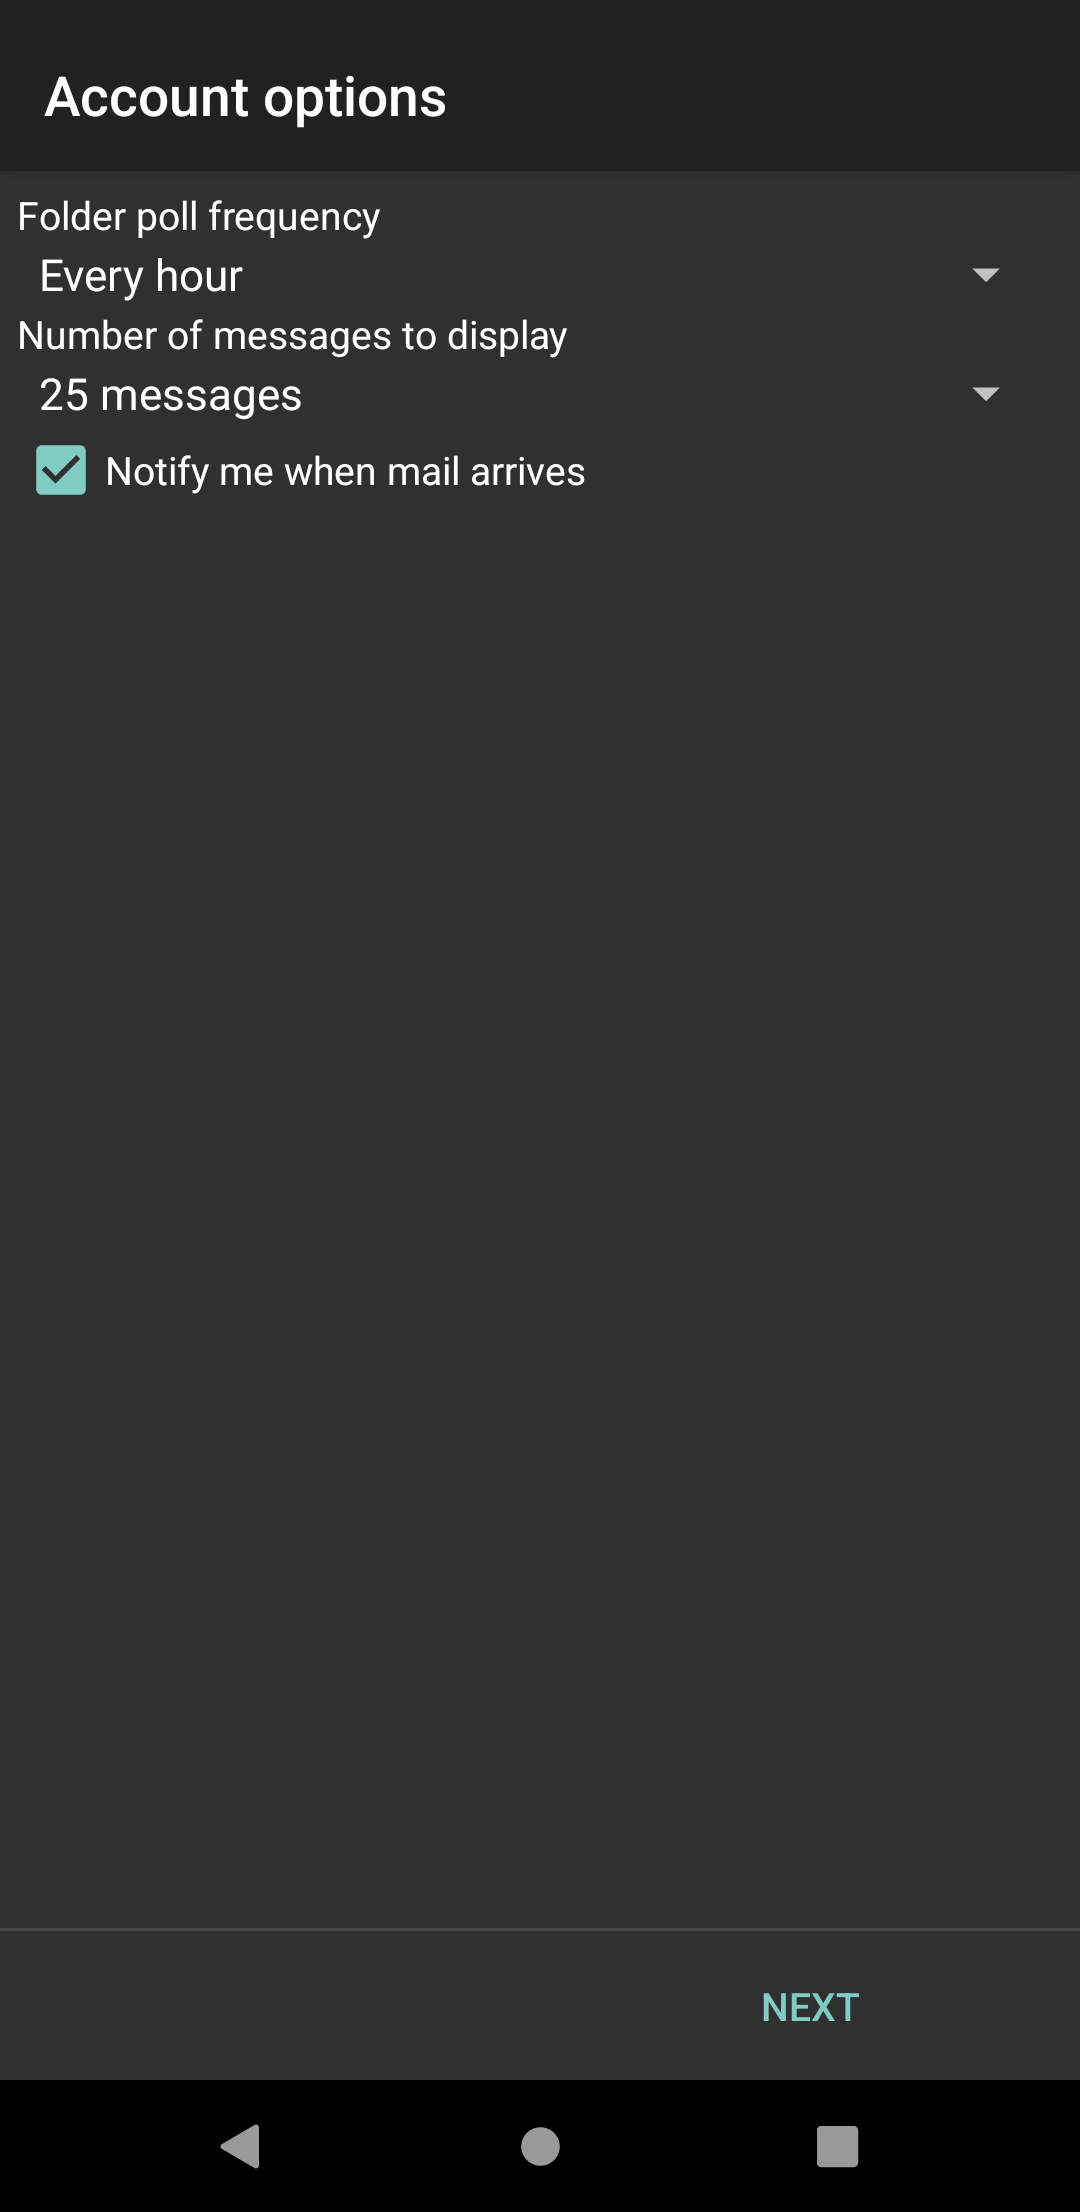
Step 6: Confirm the account options
Confirm the account options.
The folder poll frequency of one hour should be okay. In a later step you can activate IMAP push notifications if you want to receive new e-mails immediately.
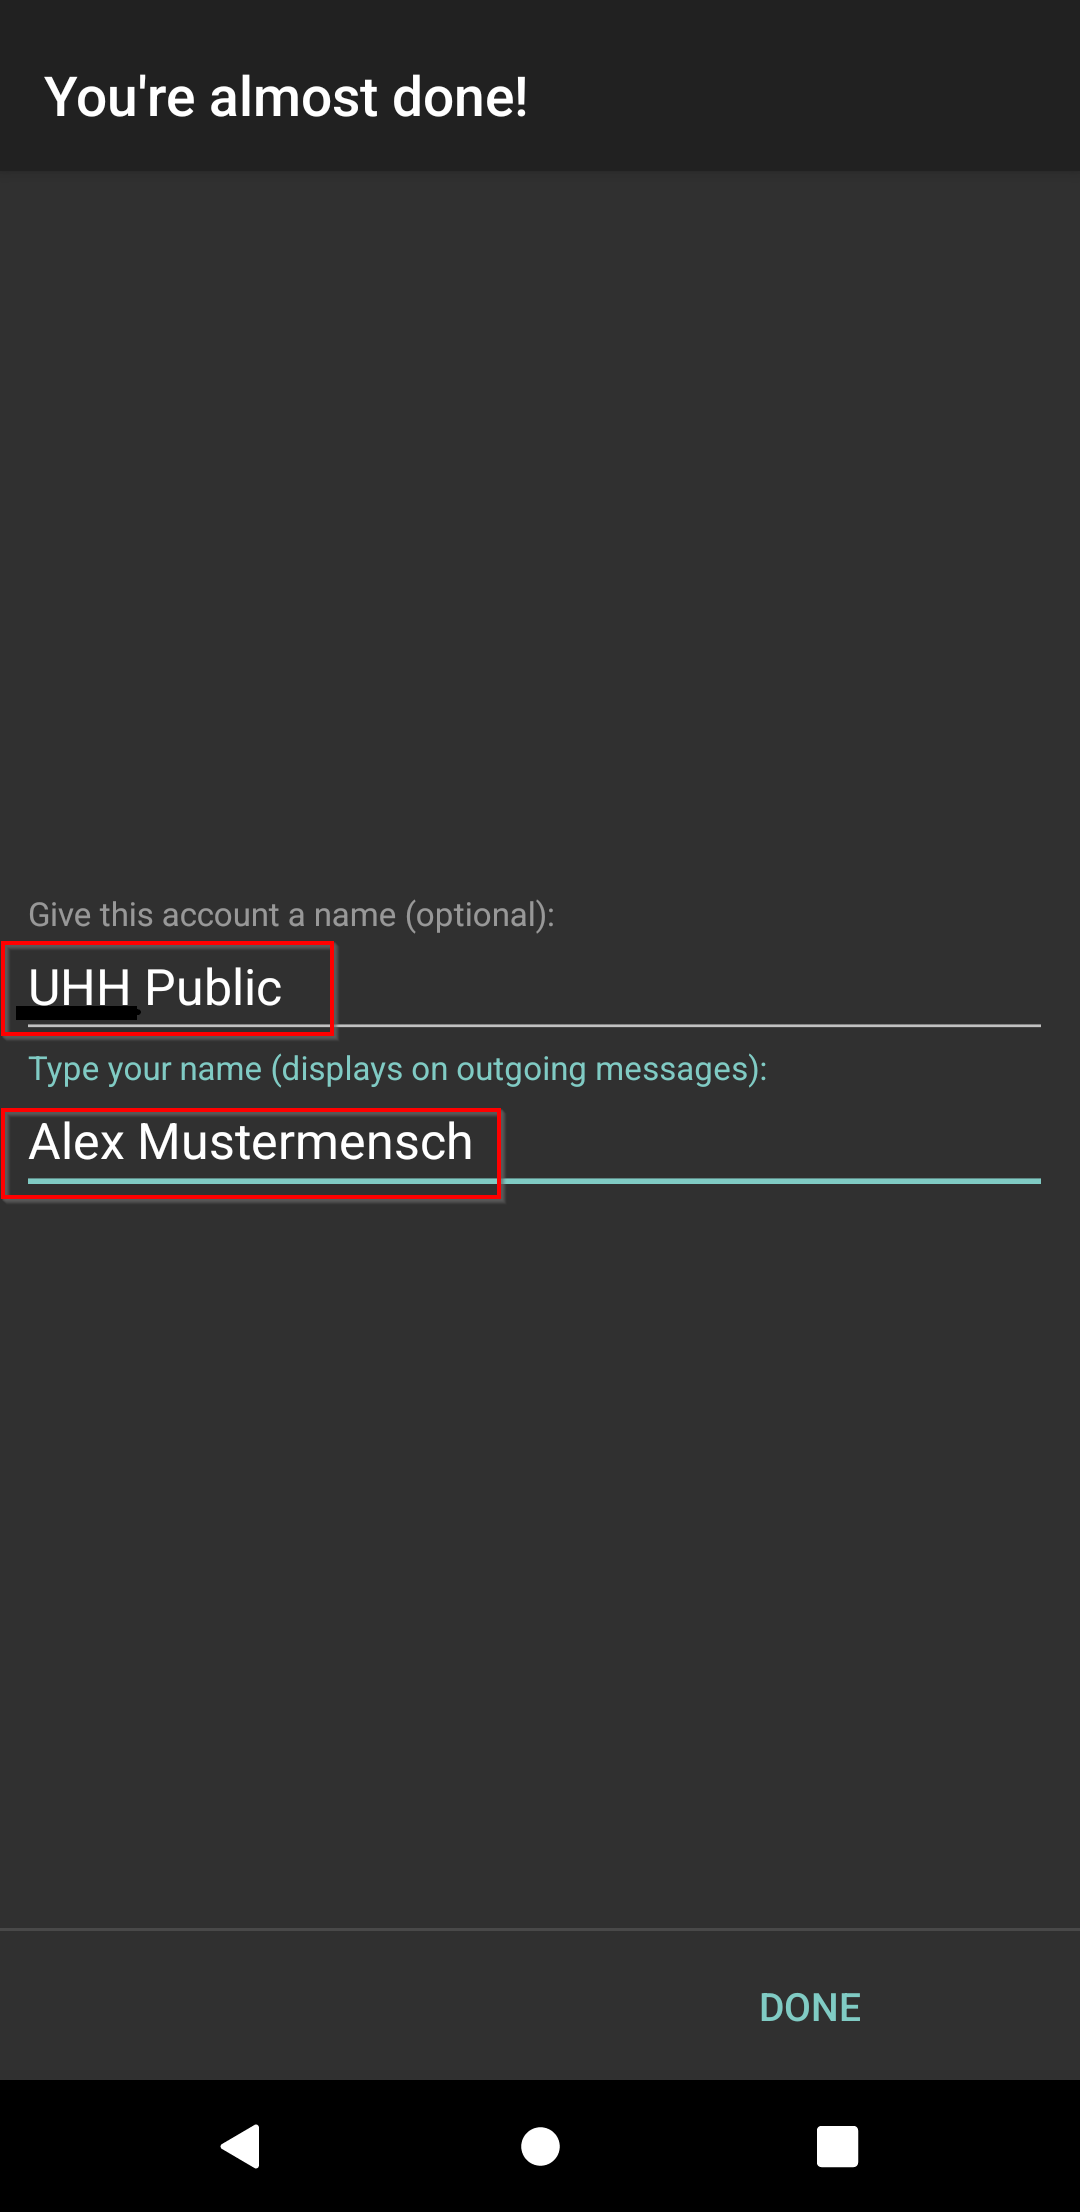
Step 7: You're almost done!
We recommend giving the account the name "UHH Public" and entering your name.
Step 8: Confirm Permissions
Confirm Android permission requests as wanted. We recommend allowing the permission for the contacts.
Step 9: Done!
Done! Now you can read and write @studium.uni-hamburg.de e-mails.
Optional: Enabling immediate new e-mail notification (IMAP Push)
We recommend enabling IMAP Push to receive an immediate new e-mail notification!
Troubleshooting
If you are facing any problems while setting up your student email account, do not worry and check up on the following issues:
- Verify if you have added a blank space in the text fields by mistake at any point of the process.
- Make sure that you entered data do not contain any typographical errors.
- Use the correct password! Better check twice and use the Surfmail Webclient to verify the correctness of the password that corresponds to your University Hamburg username. If it is possible for you to log in to Surfmail, you can be sure that you have chosen the correct password.
If you have checked this and the problem still persists, check this FAQ article for the further steps to solve the problem.
